TURKEY BOX CALL CONSTRUCTION
I have manufactured my Dual Hens turkey box calls since 2006 and
recently decided after this last batch of calls I am working on and/or
use up the majority of box call wood that I have on inventory, I will
retire the turkey box calls and complete other
woodworking projects
of
interest, our Lord willing of course.
Since I have forty-five (45) calls with all the basic machining completed on
them, I will proceed with the steps necessary to complete them. It
should be noted, there are many ways to make a turkey box call and as
stated three paragraphs down, I designed my call with the machines and
tooling capability that I had without re-inventing the wheel and
spending a bunch of money.
However, later (our Lord willing of course) I will do a step by step tutorial from the raw block of
wood using my custom jigs and fixtures to fill in the gap. When
using jigs and fixtures, it is best to complete each phase of the
woodworking process on all the wood blanks (entire lot) since the set-up
time consumes a good amount of time. With jigs and fixtures, each
part will be nearly identical to each other depending on the accuracy of
your jigs, fixtures, equipment and the operator skill in using them.
It would be a luxury to have enough drill presses, table saws,
planers, routers, etc., to not have to share multiple jigs with them,
but that is the way it is sometimes!
Most production turkey box call manufacturers now use CNC machines for mass
production, whereas it is not feasible for a small operation due to the
initial outlay of cash, unless your pockets are very deep. Some call makers have the ability to
manufacture their own specialized CNC machines, but that was out of the
question in my case without a milling machine, lathe and welding
equipment, etc.,..............grin if you must!
As stated earlier, my call was designed with the machines and tooling capability that I had
without re-inventing the wheel!
There are at least eight (8) different operations; e.g., (surfacing, routing,
sawing, etc.) used on the box call body blank (call body) that
is depicted a couple paragraphs down the page.
NOTE: If I were not discontinuing the manufacture of my
Dual Hens turkey box calls, I probably would not give detailed information about
the manufacture of said calls for obvious reasons. Maybe this
information will help someone desiring to make their own turkey box
calls with semi-production in mind. Some of the fixturing aka jigs
would definitely not be feasible for making only a few turkey box calls.
However, the
mortise jig based on Pat Warner's design, is versatile for
other woodworking projects.
PERSONAL SAFETY AND LIABILITY ISSUES
My goal will be to keep
Safety paramount because hand and power tools can
do serious bodily harm and death if not used properly, therefore these pages
are solely for entertainment purposes only from a personal
liability standpoint. Please read the
Legal Stuff
page for additional information concerning liability issues before going
any further. Safety glasses and hearing protection is a must although
I do forgo the hearing protection many times; my bad!
BOX CALLS AND LIDS
Below are pixs of the machined box calls and lids in various stages
of completion as mentioned at the
on start of this page.

I used a special set of custom ground molding knives for my Jet planer to cut
the radius on the underside of the box call lid. The knives were
installed in the center of the planer cutter head which was designed
especially for making special moldings. I will install them later in
the planer cutter head, but will locate the knives and show a pix of them. Also, I
had to make a special "trough"
to guide the box call lid blank under the radius cutter knives, of which the trough/platform was bolted to the planer lower
table.
Go to my Shop pixs page
which gives additional information about making the box call lids.

See this
link showing the set-up and changing the regular planer
knives.
RADIUS CUTTER BLADES
The edge guides had to be ground down where the rubber feed and exit
rollers are located, otherwise there would wear out where the guide
strips are located underneath the rollers.

Above set of knives for the box call lid radius which bolted into a
special slot for molding knives. The width of the cutter knives
are 2.25 inches and if I am not mistaken, the radius on the cutter
knives is 2.25 inches.
With the radius knives in place, you could still use either side of the
planer cutting head for regular surfacing wood to the desired thickness,
but was limited to about 4 inches on either side of the molding
aka cutter knives. The planer thickness of cut gauge would not be
calibrated correctly when the radius (molding) knives were installed.
Once I cut the radius on the entire lot of box call lids, I later removed the
auxiliary "trough" and the radius knives from the cutter head and
readjusted the feed rollers. This allowed me to use the
planer as needed for other general purpose resurfacing wood.
For full time turkey box call production, a separate planer and/or
molding machine would be dedicated for such. Larger companies are
using CNC machines to produce the radius on the box call lid blanks also.
A FEW STEPS IN MAKING THE LID
I checked my inventory of Eastern Red Cedar and selected the boards
with as vertical grain as possible and no less than a forty-five degree
angle, of which the quarter sawn aka vertical grain works the best for a
turkey box call lid in my humble opinion, although flat grain lids will
work at times.

Above lid blanks have been resawed using my table saw the evening of
07-11-2022. The boards were at least 1.125 inches thick and after
ripping them to 2 inches in width, they were then re-sawed aka split in
half. There was a good amount of waste due to bad places in the
boards, etc. All the lid blanks were then planed down to a little
over .375 inches in thickness. The boards that had knots in them
and bad grain, quickly blew apart when going under the planer cutter
head knives.
INSTALLING RADIUS CUTTER KNIVES
The protective shield over the planer/molder cutter head had to be removed from the
Jet planer/molder exposing the cutter head. Setting the planer up
with the radius cutters takes some time and patience, but I got them
installed on 07-11-2022 and will add a few pixs.

As shown in the pix above, the molding cutter aka radius cutter is about
3/16 inch above the regular planer knives and the feed rollers have to
be set that amount lower. I have set-up blocks made for that
purpose.

You can see two of the three radius aka molding cutters in the above
pixs. Also, I have the trough installed that will guide the lid
blank underneath the cutters.

Everything worked out real well cutting the radius on the lid blanks.

After the radius was cut on all the lid blanks, I set up the small
crosscut table saw sled to cut the lid blanks to their final length. There
was a good amount of "culls" due to bad knots and blown out places in
the lid blanks, but ended up with a good amount of lid blanks; probably
more than I will use.

Some of the lid blanks yielded three (3) lids, but two blanks was about
normal due to the bad places, etc.

I will definitely have more lid on hand than I need, but hopefully will
use them up.
VERTICAL GRAIN AKA QUARTER SAWN

In the pix above showing an end view of the box call lid, the grain is
running nearly vertical which in my humble opinion gives the best sound.
On the other hand, when the grain is running more horizontal aka
plain sawn
(opposite from the grain in the above pix), the lid is more flexible and
doesn't have the stiffness required. Inlaying wood marquetry, wood
strips and
wood purfling in the top of the lid also stiffens the lid, but vertical
grain orientation works the best! The vertical grain lid grips the
box call sound boards much better.
WOOD SAWN DIAGRAM

Most sawmills use the plain sawn method to process logs after squaring
the log, therefore you
will get a few pieces of wood that is true vertical or quarter sawn from
the log as depicted above. Quarter and rift sawn wood is
definitely more labor intensive! Musical instruments such as
guitars, mandolins, violins, etc., utilize quarter sawn wood for their
tops, backs and sides which yield the best volume and timbre.
Above image from the internet!
Web page updated by Bill aka Mickey Porter on 07-17-2022.

There was at least forty (40) percent waste which is about normal for Eastern
Red Cedar that has plenty of knots. I will use the cedar lids
split into smaller pieces in our fire pit when doing a
"winy" roast for our Gonzales Grand Kids.
My next step up will be to drill the pilot hole and countersink for the
box call body screw using a drill jig.
DRILL PILOT HOLE AND COUNTERSINK FOR SCREW
After the blank has the radius cut on it, then cut to length, it is time
to drill the pilot and countersink hole for the lid screw.

The 2 inch wide lid is positioned in the jig with the lid screw hole centered 5/8 inch from the end
of the lid and use a 1/4 inch diameter drill bit with built in countersinked
for using a Phillips # 8 flat head screw positioned below the level of
the lid.
As stated before, the above jig is dual purpose and used to position the
2 inch radius cut-out portion of the lid handle using a 4 inch diameter
hole saw in the drill press.
When time permits and I have the above jig free from drilling the
tapered pilot in the box call body, I will do a set up showing the 4
inch diameter hole saw sawing the radius portion out for the lid handle.
LID HANDLE RADIUS
I located my 4 inch diameter hole saw and set the jig up to saw the
radius portion of the lid handle. This is a newer 4 inch hole saw
made by Morse and cuts much better than the older one, circa. 2006 I was
using; wonder why...........grin if you must!

The Morse hole saw does a great job in cutting the radius on the lid
handle requiring very little sanding.

The lid width is normally 2 inches wide when I saw the radius portion of
the lid, however this lid has already been sized to 1 3/4 inch in width,
but adequate for demonstration purposes.

The lid is flipped over 180 degrees and the other side is sawed as
depicted above.
NOTE: I later installed a stop block to the left of the jig
to prevent the hole saw from trying to move the lid blank to the left
since the hole saw in rotating in a clockwise direction.

LIDS CONTINUED

The above lids with the handle radius cut, hole drilled for the screw.
My next operation will profile cut the width of the lid using a jig and
flush cut router bit in the router table. I am guestimating there
is about 7 gallons of lid blanks that didn't make the cut; e.g.., bad
knots, chip out, etc. I will count the lids later to ascertain how
many there are.

Above lids will be routed for the wood marquetry aka wood purfling
as needed, drill for the
turkey track button and sand a forty-five degree angle on each end.

There might be more than seven (7) gallons of waste aka culls.
Web page updated by Bill aka Mickey Porter on 07-04-2022 and 07-13-2022.
WIDTH OF LID ROUTED TO FINISHED SIZE
The lid after the hole and countersink for the lid screw is completed,
the lid blank is placed on a router profile jig which is indexed with
the pilot hole for the screw being 1/4 inch outside diameter.
I will show the profile jig and the lid blank in position only, since I
have the router table set up for something else at this time. I
use a flush cut two fluted carbide tipped router bit to cut the profile.
You could set the table saw up and do the same thing by removing 1/8
inch from each side of the lid blank. As the ole saying,
"Six of one and half dozen of another."
The table saw
would be much faster.

You could eliminate this operation by sizing the lid blank to 1.750
inches in width, but would have to change the width in the trough when
cutting the radius on the lid using the planer.

NOTE: Above for demo only since I route to width the blank
after the handle radius is cut.


A close up view of the width profile jig with the base of the jig riding
against the router bit flush cut bearing.

This profile jig doesn't have much width to it and you definitely have
to pay attention to where your hands are. I keep my left hands/fingers
on the end of the red handle and my right fingers and thumb pushing the
side of the jig away from the router bit. You are only removing at
the most 1/8 inch from each side of the lid if the lid was centered in
the handle cutting jig. Sometimes, the lid blank width is barely
over 1 3/4 inches with just enough width to clean the edges during the
routing operation. This
type of operation would not pass OSHA's safety standards for
sure!
The jig could be made safer by adding much more width and length to the rear of the
clamps where the
profile is being routed keeping your hands/fingers further away from the cutter
aka router bit.
Web page updated by Bill aka Mickey Porter on 07-14-2022.
DRILLING HOLE FOR THE TURKEY TRACK BUTTON

The above is a dedicated jig for positioning the lid for drilling the
turkey track button and/or eagle medallion. The bottom of the jig
has a concave radius to match the radius of the lid. Appropriate
drill bit is used and the jig is positioned under the drill press chuck
for proper alignment and the depth stop is set on the drill press for
the required depth of cut.
NOTE: I had a set of special molding blades ground to
produce the concave cut in oak hardwood for usage in making several of
the jigs depicted in this tutorial.
ROUTING THE LID FOR WOOD MARQUETRY AKA WOOD PURFLING
The router table is set up for using the RB4 wood marquetry and used a
sacrificial board clamped to the router table fence which reduces end
snipe which means one of the router table fence members is not in
"perfect" alignment with each
other. I used the band saw to make a rough cut out in the
sacrificial board for the stacked slotting cutter that matches the
pre-war Gibson Mastertone banjos
style # 4
wood marquetry.
Since the slot for the wood purfling would cut into the handle portion
if you make a continuous and not stop the cut short, I placed a start
and stop mark on the sacrificial fence; a black line to the left and
blue tape to the right.


FORTY-FIVE DEGREE ANGLE ON EACH LID CORNER
I used my forty-five degree miter sled to saw the corners off the box
call lid and used the left miter for cutting the front of the lid and
used the right miter for cutting the handle portion corner of the lid.

I use the above forty-five degree miter sled for many projects.

You cut on side of the end and flip the lid over and keep the lid as
straight as possible when the radius portion of the lid in on the miter
sled.

You have to adjust the end stops for each side of the sled as is obvious
due to the lid handle design.
It is best to sand the forty-five degree angle on the handle end of the
lid because as depicted above, the end is unsupported and you will lose
a lid or two from chip out. If I were doing a batch of lids, I
would temporarily add a piece of the radius removed from the lid and
affix it to the miter sled to prevent chip and tear out.

This jig is about as simple as you can get!

There are no stops on this jig, but a reference line when you sand the
forty-five to the correct width.

This is free hand with no stops to control the width of the forty-five
degree taper.
Web page updated by Bill aka Mickey Porter on 07-04-2022,
SANDING HANDLE RADIUS ON LID

I use a 3 inch diameter sanding drum with a 80 grit sanding disc. in the
drill press to smooth up the edges from the hole sawing operation and
remove the over hang of the wood purfling aka wood marquetry.
A vertical drum sanding machine would be the way to go, but never owned
one. I finish sanding with a couple Porter-Cable # 330 1/4 sheet
palm sanders of which are obsolete now and replaced by the # 380 model.
You could go a little more high tech and use a flush cut router bit and
pattern to trim the wood purfling aka wood marquetry overhang and pay
attention to the grain. I have not tried this method and the wood
purfling might blow out since it is very fragile. You would still
have to sand the edges of the lid handle radius portion, so the above
method is probably the best for me!
Web page updated by Bill aka Mickey Porter on 06-25-2022.
TURKEY BOX CALL BODIES

All the major woodworking machining is completed on the above calls.
I normally excavate the torpedo nose taper using a DeWalt 3 HP plunge
router with a special dedicated
mortise jig just for that
purpose. The router bit used is a standard off the shelf router
bit. I routed two torpedo nose tapers on a wood blank that
would yield two box call bodies in the pix below.
Here is an archived pix from way back when:

NOTE: While finishing up 42 of the 45 call blanks on
06-15-2022, I noticed that one of the last calls that I finished was
Honduras Mahogany. It was observed that the call body was
from the mahogany blank in the above pix; second row from the right of
the pix. See pixs below for comparison:


I apparently cut the end of the blank back at least an inch to try and avoid the
knot area, of which turned out real beautiful!
MORTISE JIG
Below is a pix of the mortise jig (Pat
Warner design) which is nearly identical to the one
dedicated for my turkey box calls only except for the north to south
stop blocks. This jig I use for various
mortise operations needed and its construction is hyperlinked
here:
My turkey box call mortise jig has fixed stops for positioning the wood
blank onto the mortise jig and the router base guides are adjusted to center the
mortise in the wood blank. I normally use two (2) inch square box
call blanks 12 inches in length,
however my mortise jig can accommodate less than 2 inches in width using
wood positioning shims as necessary and of course wider blanks which is
not feasible. The turkey box call mortise jig and router are
normally not
readjusted, unless as noted above.
My dedicated turkey box call mortise jig is under the wood box in the
pix below, top left, of which I store drill bits and other stuff on top
of the box. Since that was a proprietary jig, I kept it out of view
from visitors to my shop...................grin if you must!
One of my DeWalt 3 HP plunge routers is set up and dedicated for turkey
box calls only and the jig below is my general purpose mortise jig.
I used the below mortise jig to route the mortises on my
curly maple
end tables. I used this jig instead of the square
chisel mortise machine, of which making a 1/2 inch width mortise in hard
curly maple is a little difficult with a light duty machine.
I also used the above mortise jig when making my
full mortise lock
jig.
CLOSE UP OF THE BOX CALL BODY

The torpedo nose taper of the box call has been routed out on the
blank. It takes some serious jigs and fixtures to arrive at this
point for a professional looking call body. To obtain a near burn free route, you must plunger the router
bit about 3/8 inch at each end of the blank and move in a north to south
and south to north direction which is controlled by the jig. If you stop the router,
you will burn wood even with a new router bit! The plunge router
depth stop is set and rarely if ever moved.
As stated above; it takes at least eight (8) separate operations to
arrive up to this point in making my Dual Hens box call (body) only!

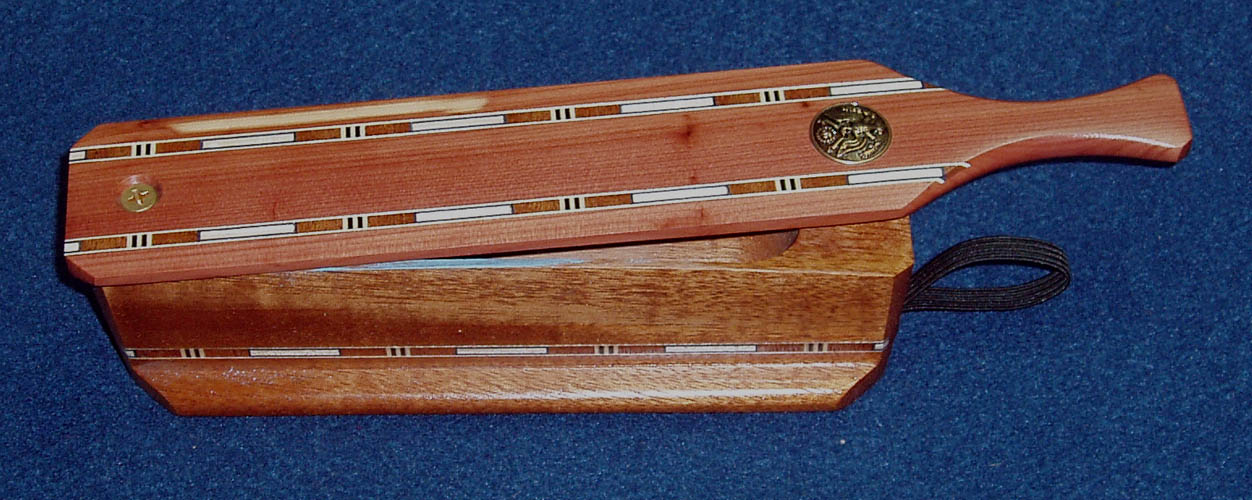
Side view of the box call with the radius profile routed (shaped) on the sound boards,
end of call tapered and the routed slot for the wood marquetry inlay.
The base area has also been routed aka half round.

End view of the call showing the concave routed end which matches the
radius of the lid, side taper and
base routed. My Dual Hens calls are from one piece of wood, no
laminations. I try and orientate the grain as vertical as possible
and believe the quarter sawed blank gives each sound board more
stiffness and other desirable tonal qualities.
Above a slice of the turkey box call showing the inside profile (end
view) of the call body. Notice the center of the sound boards
(side view) are thinner than the top of the sound boards. The
taper is controlled by the router bit diameter, profile, depth and the angle of the sides.
No two calls will sound exactly alike,
even though machined to the same thickness due to the properties
(density), grain structure and orientation of each
individual piece of wood, even though from the same billet of wood!
See shop pixs
page for additional information.
Web page created by Bill aka Mickey Porter on 06-01-2022.
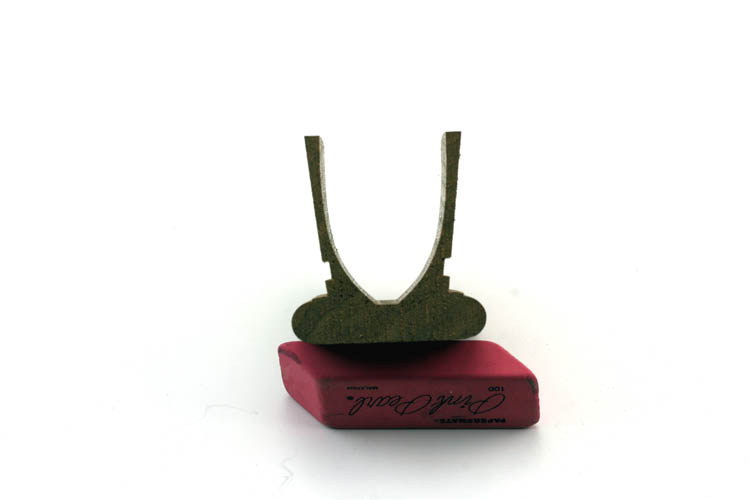
DRILLING THE TAPERED HOLE FOR THE LID WOOD SCREW
Below are pixs of a simple locator for positioning the tapered drill
bit and countersink hole in the body of the call to attach the lid to
the call. I am using a # 8 brass wood screw 1.5 inches in length.
I am using a 11/64" tapered drill bit with adjustable and removable
countersink.

The rear of the above jig has a ledge to abut the box call body.
The left portion of the jig is used to hold the 2 inch wide lid blanks in place and
using a 4 inch diameter hole saw, cut the handle portion of the box call
lid. You flip the lid over and complete the handle shape. The jig
is also used to drill the hole for the lid screw.

I drill the tapered hole in the body of the call before sanding the
forty-five (45) degree taper on each end of the call and add the wood
marquetry inlay after testing the call for sound resonance, etc.
These two pixs are out of sequence, since I drill the lid screw pilot
hole before installing the wood marquetry....my bad. The
countersink also provides a recess cavity for the lid spring to rest in.
NOTE: Unless your box call body width at the base is
consistent from one call to another, a locator jig as above will not
work. It takes very little time to mark the center with a fine
point pencil; in my case, 1/2 inch from the end of the call. First
draw a line 1/2 inch from the end of the call across the call width,
then mark a line 20/32 from each side and you have a witness to where
the center of the call body is located. Using a scratch awl or
spring loaded center punch, indent the wood for the drill bit point.

TRANSFERRING THE LID RADIUS TO THE SOUND BOARDS
Before adding the wood marquetry inlay to each side of the box call
and the lid, I first match the radius (curve) of the lid to the box call
sound boards. I initially use 80 grit aluminum oxide sanding
paper double stick taped to the radius portion of the lid and position
the sandpapered lid on top of the box call and sand back and forth the
length of the sound boards. It is imperative to keep the sand
paper backed lid
equally spaced or centered on the box call for a near perfect match or
mate up of the lid to the sound boards. I then finish with a 100
grit aluminum oxide sanding paper attached to a lid which matches the
radius portion of the lid.


It takes about a dozen or more longitudinal strokes back and forth to mate
the lid radius to the call body sound boards depending on the hardness
of your wood.
INITIAL TUNING OF THE BOX CALL
With the lid attached to the call body with the brass wood screw and
spring in place, the call is tested for sound quality which is not an
exact science. Any tuning necessary, the inside of the sound
boards are sanded using 150 grit sand paper; just a few strokes at a
time and then check the sound. Sometimes, a call lid will have to
be replaced to give the desired sound; e.g., tone, volume, pitch, etc.
As noted elsewhere on this website, different woods give various pitch
sounds, whereas the harder density woods will render a higher pitch
tone. I believe Butternut wood gives a much lower pitch sound with
all things being equally compared.
I have tried different species of wood for the lid, but aromatic red
cedar works best for my call body and gives the sound I like, but hearing
is definitely subjective.
The majority of box call makers will tell you, your lid needs to be a
harder wood than the call body, but that is very subjective to say the
least. Neil Cost advocated that, whereas he was the early leader
icon and who doesn't want to follow the leader?
Once the desired sound is obtained, I will add the wood marquetry inlay
to the call body and call lid and let it cure overnight.
ADDING THE WOOD MARQUETRY INLAY
The wood marquetry aka wood
purfling I am using was
originally used on Gibson pre-war banjos, mostly their
#
4 model. I
had this wood purfling reproduced in Erlangen, West Germany in the early
1970s and I am sure the vendor Franz Dotzauer out sourced it to a company that
specialized in the manufacture of wood purflings aka wood marquetry.
This wood purfling aka wood marquetry is available from several Musical
Instrument supply houses here in the USA. Dotzauer's son Gerard,
did all the correspondence for his Dad Franz and Gerard supplied the
required wood purflings aka marquetry when I started making turkey box
calls, but currently is not able to supply said marquetry aka wood
purflings. Several music supply houses offer the same wood
purflings (retail price only), but they are now very expensive for my usage; e.g., at least
$ 9.00 per 31.5 inch length strip.
To route the slot in the box call body and the lid, I use a dedicated
stacked slotting cutter in my router table (Bulldog brand) router which has a 3 1/4 HP Porter Cable
router with crank screw up lift, whereas the slotting cutter matches the width of the wood marquetry. I adjust
the table fence for depth of cut and the router lift for the proper height of the cut, of which I
will show in detail the next set-up of the same. The call body has
to be elevated at about a six (6) degree angle using a tapered wedge
double stick taped to the router table in order that the routed slot
will be perpendicular or at a right angle to the slope aka taper of the
call body sound boards.
CALL BODY MISSING ONE ROUTED SLOT FOR MARQUETRY WOOD
INLAY
While working on half dozen calls the afternoon of 06-07-2022, I noticed
on one call body, there was only one routed groove for the wood
marquetry inlay, therefore I set the router and router table up to make
that one missing cut.

As depicted above, the slot aka groove for the wood marquetry wood inlay
is missing. Didn't notice it until I got ready to glue the inlay
in place................grin if you must! For whatever reason, I
have the wood grain in a horizontal orientation on this box call and
normally have the grain running vertical. Sometimes, the wood
blank is sized too small, etc..

The basic set-up to route the groove for the inlay strips on the box
call body; 1) Install dedicated slotted cutter for the RB4 wood
marquetry inlay, 2) Add the 6 degree taper board to the router
table whereby routed slot will be at a right angle to the box call,
3) Adjust the router fence for the proper depth of cut, 4)
Adjust the router height.

Normally, when I do the entire lot of box call bodies for the wood
marquetry inlay, The base of the call doesn't have the half round radius
on the call, just square at that point. The slot for the wood
marquetry inlay is at the proper height and depth on the call body.
The camera lens angle distorts the true parallel orientation of
the box call side to the router fence.
If your router table fence to the left is not set properly, you will get
a snipe cut at the end, therefore a much safer method is to reference
the tapered sound boards against an auxiliary board positioned above the
slotting cutter.

Above pix of the board mentioned above which prevents end snipe.
Web page updated by Bill aka Mickey Porter on 06-07-2022.
In the mean time, check out my
ceramic and wood pot holder pages which
gives a detailed set-up of using the slotting cutters and adjusting the
router table fence and router lift which is applicable to routing the
turkey box call body and lid.
The end view of the call body several paragraphs above will make clear
what I am describing.

I center the pattern of the wood marquetry wood inlay into the routed
slot as depicted above.

I normally match the wood marquetry wood inlay at the front of the call
(screw area) to keep from wasting the inlay. I use mostly Bohning
Fletch-Tite Platinum glue for gluing the wood marquetry aka wood
purfling in place.
ADDING THE TURKEY TRACK MEDALLION
I started out using a Eagle medallion aka button on my early calls and
later went to the
turkey track pewter button copyrighted by Sid Bell,
now deceased. The turkey track pewter button is available from
Jeff Karner who purchased Sid Bell's molds, etc.
In a couple pixs above, you can see where I have ground the back of the
turkey track button flush. I set up my drill jig and used a 29/64
inch diameter spur drill bit that had the spur ground down to nearly flush with the
flat cutting flutes similar to a Forstner bit. I used Bohning
Fletch-Tite Platinum glue to keep the turkey track medallion in place.
SANDING THE 45 DEGREE TAPER ON EACH CORNER OF THE BOX CALL

Notice there is also an inclined angle plus the 45 degree taper on each corner
which is controlled by the jig.

The width of the angle desired is totally free hand.

I position each corner of the box call body onto the sanding sheet on a
flat surface such as the table saw top and push the box call away from
myself, one stroke, not back and forth. It takes at least ten (10)
strokes to get the 80 grit sanding lines out from the 6 x 48 inch
sanding belt.
ANOTHER JIG TO REDUCE HAND SANDING
NOTE: I could have made an accessory (elevation blocks) to
attach to my forty-five degree
miter sled to accomplish the same thing
using a crosscut 10 inch blade on the table saw and probably would save
some sanding time. I looked at using my 45 degree miter sled to
cut the 45 degree angle on each corner of the box call body, however
with the appropriate tapered elevation block underneath the call body,
the 10 inch diameter saw blade was not large enough in diameter,
therefore I canned that idea. To not be outdone, I made a jig just
for the 12 inch diameter miter saw for the required cuts; pixs below:

I used scrap aka unallocated wood to make the above simple jig. I
will later affix the permanent length stops.

Another view of the jig. The mahogany block positioned for the 45
degree angle cut and the pine board tapered wedge elevates the call body
for the proper angle. The rear blocks has 1/4 inch diameter hex
head bolts to attach to the miter saw fence existing holes for
positioning and securing the jig to the miter saw base.
I field tested the jig and it works fine and leaves a smooth cut which
will required little or no sanding.


I will add stop blocks at the front of the call to control the width of the
cut and remove the rear stop since any variation in box call length will
manifest itself when cutting the bevels. I also added an extension
of the above 45 degree mahogany block on each side to prevent any side
to side movement of the call body.
FINISHED AND FINE TUNED THE JIG


ADDED DOWN STOP AND ADDITIONAL THICKNESS TO BASE
As stated below, the jig works great, however with only one 3/4 inch
thickness base, it was easy to saw through the base member without a
down stop cut block to reduce the blade depth travel.

The jig works great and reduces the sanding of the angles to nil and the
stops are set where a shorter or longer call body will not change the
angle and width of the miter cut. There is no way to cut through
the base of the jig with the stop temporarily in place. I will
store the down stop block with the jig and C clamp it into position when
needed to save storage space.
I have eleven (11) machined Sassafras box call bodies that I did with
the six (6) figured walnut blanks and look forward to using the jig to
complete the Sassafras calls.
Web page updated by Bill aka Mickey Porter on 06-22-2022.
All other sanding is done with two (2) Speed Bloc hand sanders; one 150
grit and the other 320 grit. I change the sanding paper about
every 6 or more calls.

The above hand sanders get a good workout on all my small projects.
The above are made by Porter-Cable and my original one I used
while in the music business was made by Rockwell and the Porter-Cable
hand sanders are the same. You obtain four (4) sanding sheets from
a standard 9 x 11 inch sanding sheet.
NOTE: I was thinking about purchasing another Porter-Cable
Speed Bloc # 330 palm sander, but they are discontinued and replaced by
the 380 model which has a dust collection bag. The ole saying I
like to use,
"If it ain't broke, don't fix it."
APPLYING FINISH TO THE BOX AND LID
I have found over the years, the less finish applied, the call is more
resonant with more tone and volume. Too much finish will definitely
mute the sound of the box call with all things being equally compared.
Therefore, I apply one coat of sanding sealer and at least one coat of
lacquer. I normally will lightly buff the call and lid with a Scotchbrite green pad
between the coat of sanding sealer and the finished coat of lacquer.
I basically remove about all the sanding sealer from the torpedo nose
cavity in the call body and do not apply any lacquer to that area.
I use Deft sanding sealer and Deft gloss lacquer using the aerosol
spray cans to apply finish to my box calls. I do have production
type spray equipment
for other
projects as needed, however short runs of spraying calls
makes clean-up a hassle using my spray equipment.
NOTE: Before finishing this project, I could not locate any
Deft gloss lacquer at a reasonable price and ordered musical instrument
grade lacquer manufactured by Mohawk which worked great!

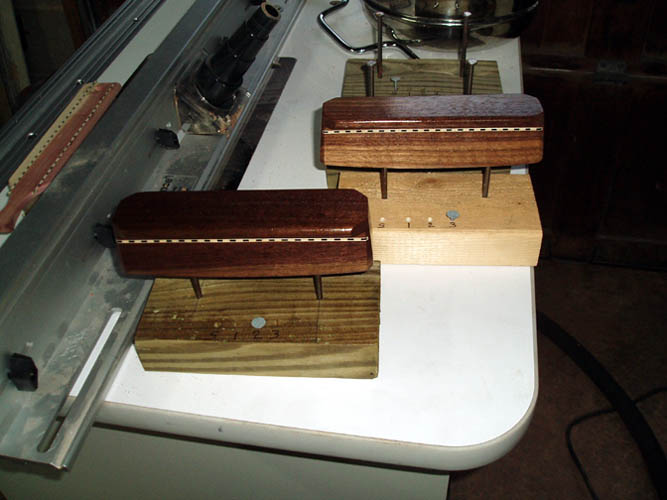
I have six (6) block sets for the call body and the call lid labeled to
keep the lid with the body and has holes drilled in the call body holder
to keep track of the sealer and finish coats applied. I could not
get a good pix of the calls above due to a bright back light situation.
It should be noted that I tape a portion of lid radius to prevent
lacquer on the lid area that makes contact with the call body.


After the sealer dries ( a couple hours time), I will spray each call
body and call lid with a coat of Deft gloss or semi-gloss nitrocellulose
lacquer depending on what I have on hand. I have on order several
cans of Mohawk Musical Instrument gloss lacquer and will use it versus
the Deft simply because I cannot find the Deft High Gloss lacquer
anywhere in stock.
Once the finish is cured on the calls, I will go over the sound boards
with the mating lid with sandpaper and do a final buff with the
Scotchbrite pad on the lid and call body and again check the call for
sound.
ADDING THE LID SILENCER
All my turkey calls have a lid silencer to help keep the lid from making
sounds while going to and from your hunting location. I use an
upholstery nail and 1/4 inch wide elastic material. I use a scratch awl
to (pre-drill) a pilot hole for the upholstery nail. The length of
the elastic material is about 4.5 inches and double the material over
and press the upholstery nail through the elastic material.
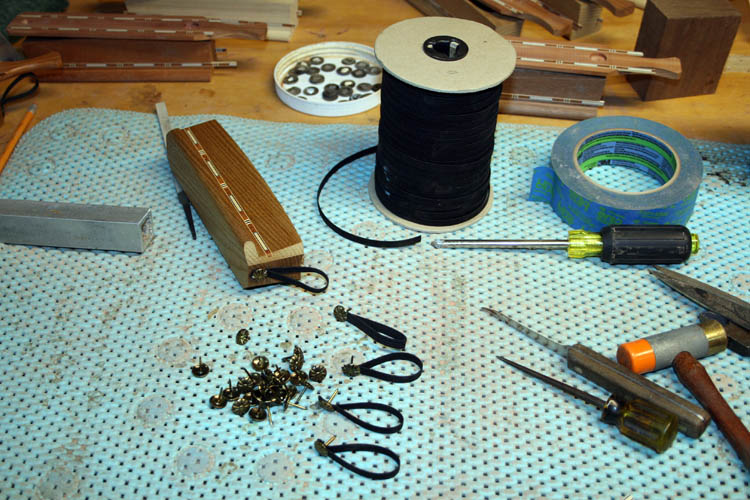
I use a small brass head hammer to drive the upholstery nail in place.
Some times in hard wood, walnut, etc., the nail will bend and have to
make a deeper pilot hole using the scratch awl.


Above is the finished call; ready for signing and dating with a
description the wood species and where originated.
I give God our creator through His Son, Jesus Christ our Lord and
Savior, the Praise, Glory and Honor in all things!
Web page updated by Bill aka Mickey Porter on 06-03-2022 and 06-04-2022.
FINISHED THE CALLS
I finished the batch of forty-five (45) calls today 06-16-2022 and will
kick back a few days before starting another project. As stated
earlier, I will do a set-up showing how the body of the call is produced
from a rectangular block of wood to complete this tutorial on how I make
my calls. However, I plan to look at other projects before doing
so and as they say, "Will place it on the
back burner."

I kept the only call blank that was butternut for myself simply because
I don't have a butternut call for personal use. Each wood species
gives its own distinct sound and tone, but I like the sound of Sassafras
the best in my call design. I guarantee you, there is some turkey
in each one of the above calls................grin if you must!
I did other things beside the turkey calls and the lacquer had to dry
before finishing each call. I do not work on Sunday, our Lord's
Day which was originally a day of rest, but Christians today use Sunday
as a day of worship and praise!
This batch of box calls will be SN 145 thru SN 190.
My earlier calls did not have serial numbers on them; e.g., Custom made
by Bill Porter, Wadesboro, NC, Date, Wood species and where obtained.
Web page updated by Bill aka Mickey Porter on 06-16-2022.
FILLING IN THE GAP - BOX CONSTRUCTION
It is about too hot outside to do much of anything, therefore I decided
to set-up the fixture/jig for routing out the box call main cavity of which I call
mine a torpedo nose taper.
As stated earlier, the mortise jig was stored with a wood box over the top of
it and I had all kinds of drill bits and accessories on top of the box.
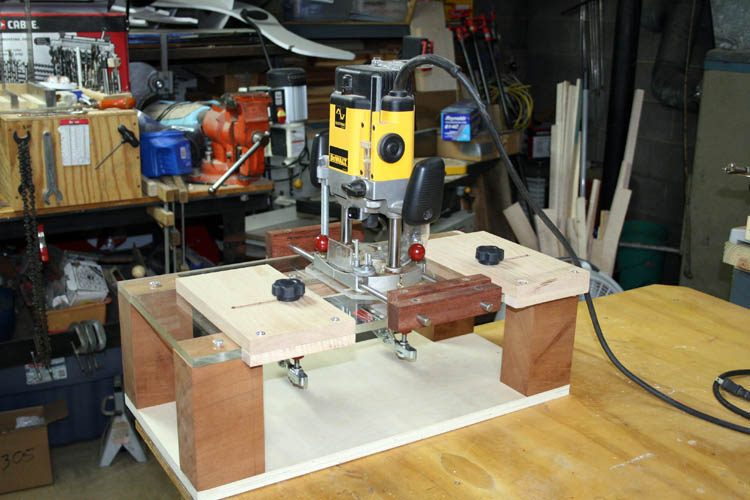
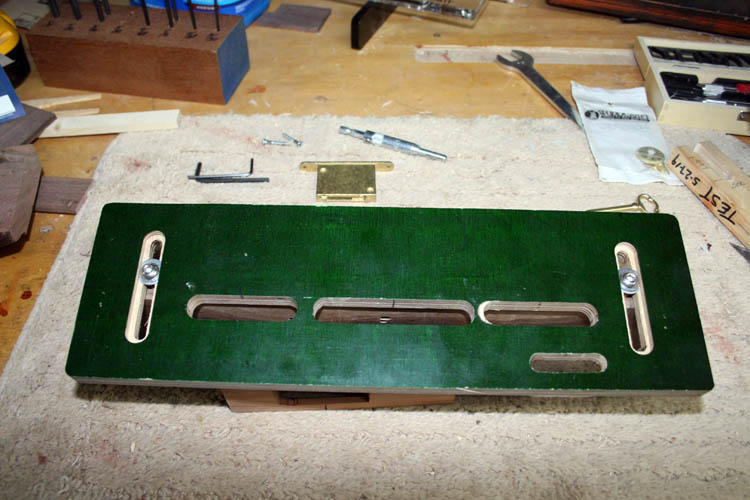
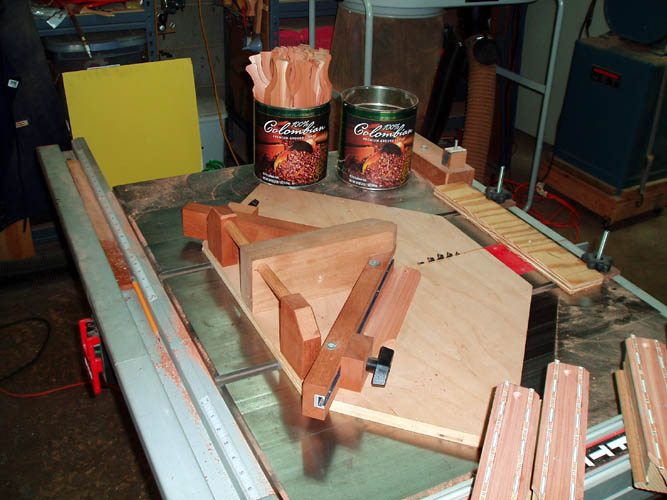
MORTISE JIG

Above is pix of the special mortise jig (Pat Warner design) set-up for routing the
torpedo
nose taper (cavity) on the box call. My
cut out aka opening in the Plexiglas member is longer than on Pat
Warner's mortise jig.
Needed extra mortise length for long box calls.

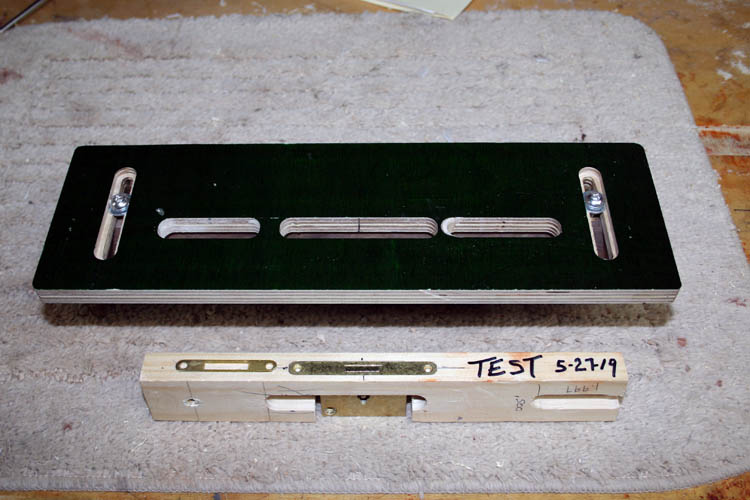
Pix showing the DeStaCo clamps that hold the wood blank it place.
Wood needs to be sized accurately, otherwise the DeStaCo clamps would
have to be re-adjusted. As will be depicted later, I routed the
cavity from shorter lengths of Sassafras wood that I purchased from a
vender in New York in 2008 and decided to do those which I
believe is a dozen blanks. I had to use adjustable bar clamps and
apply pressure from the side of the wood blanks versus from the bottom
to keep the wood blank into position due to their shorter length.
DEDICATED DEWALT 3 HP ROUTER WITH SPECIAL BIT
 \
\
The DeWalt plunge router above has the edge guides (made by Pat Warner) tightly adjusted
against the side of the Plexiglas mortise jig top and the end stops are
preset to give a 5 3/16 inch length torpedo nose taper cavity in
the call blank wood. You can move the router movement right to
left by loosing a set screw on each side of the router base casting that
allows the router to move right to left on the 3/8 inch diameter
stainless steel rods (made by Pat Warner). Router depth is set to give a 1.6
inch deep mortise and controlled by the calibrated depth stop gauge.
Nothing on the mortise jig and the DeWalt plunge router has changed
since the last time I used the jig and router.

Above two fluted carbide tipped router bit shank extended out above as far as
safe to get 1.6 inch depth of cut. The Plexiglas router base and
the Plexiglas mortise fixture top uses up about 3/4 inch of router bit
travel/router travel. I believe the above router bit is around
sixteen (16) years old.............grin if you must! Above time to
replace it versus having it sharpened which would change the outside
diameter of the router bit slightly.
MORTISE EXCAVATED

The above torpedo nose taper mortise is clean and mostly burn free, requiring
little if any sanding. The inside width at the top of the mortise
is 1.135 inches +-. I had six (6) figured black walnut blanks that
were warped and twisted due to drying out. They were cut to size
while still (green) in MO and sealant placed on each end to prevent cracking. The
moisture couldn't go out the ends, but it definitely did go out all four
sides attributing to the warp and twist. I had to do some serious jointer and band saw work to get them half way
trued up, since I reference from one side and top of the wood blank
in my mortise jig.
It took a little less than two (2) minutes to complete the torpedo nose
taper mortise in Sassafras, of which the router bit is sixteen (16)
years old never being re-sharpened and would be just a little longer in black
walnut. That might give a CNC machine a little competition for
sure for routing the cavity!
OOPS

The above is what happened when I didn't secure properly both ends of
the blank in the mortise jig! Luckily, nothing was damaged
including yours truly. The router bit is rotating
clockwise, therefore it pulled the right end of the wood blank
away from the guide rail on the mortise jig.
I purchased the above wood and maybe 2 dozen like it to be sassafras,
but after routing the torpedo nose taper mortise, it definitely did not
have the fragrant sassafras smell. I will try to ascertain what
species of wood this is.
NOTE: Kenneth Shipley of
Shipley
Outdoors, Inc., 5639 Hurricane Road, Cadiz,
Kentucky 42211 PHONE: 270-522-9857 identified the wood as
Sycamore on 07-21-2022.
The Sycamore wood blank above brings to mind Luke Ch. 19 verses 1-10
about Zacchaeus who climbed up in a Sycomore tree in order to see
Jesus!
Web page updated by Bill aka Mickey Porter on 07-16-2022 and 07-21-2022.
ROUTING MORTISE TIME UPDATE
I set up my general purpose mortise jig and installed a new router bit
in the DeWalt 625 plunger router and it took forty-five
(45) seconds to
complete the torpedo nose taper mortise in black walnut. A fresh
sharp router bit makes the difference and it cut like butter in the
black walnut...............grin if you must!

You can see some of the twist and warp in the blanks if you look close.
After truing up the blanks, some were much less than 2 inches square and
the base of the call was thinner and the width of the base lip was
narrower as well, but ended up making good sounding calls, nevertheless!
After all the black walnut blanks had the torpedo nose taper mortise
routed in them, it was time to set the table saw up using a stacked dado blade
set and dedicated table saw jig for cutting the side taper.
SIDE TAPER JIG

The side taper jig has the required taper built into it and the blank is
positioned over the locator in the center of the jig which matches the
width of the torpedo nose taper mortise in the blank. Dado blades
and spacers aka chippers are added for a flush cut with the side of the taper jig and
the table saw height is adjusted to give the desired thickness of the
base.

As depicted in the above pix, there is wood hang over, of which the dado
blades will cut it flush with the jig and gives the call sides the
required taper. NOTE: I later went back and installed a 10 inch diameter
crosscut saw blade to the left of the stacked dado blades to cut off any excess
over hang of the call base and removed one of the chipper dado blades
for the
required flush cut of the dado blades. It had been a while since
using the combination of 10 inch diameter crosscut saw blade with the
required dado blades and chipper blade.

Pix showing the call blank after the sides are tapered using the jig and
stacked dado blades. The thickness of the sound boards are .152 +-
inches and will be thinner once the top of the sound boards are tapered
using a jig and router table with flush cut carbide tipped bit. I
will route the torpedo nose taper mortise in the balance of the
sassafras call blanks and set up to cut the call body ends to the
correct taper and length using the miter saw
ADDED "CUT-OFF" BLADE TO STACKED DADO

I am using my regular 10 inch crosscut saw blade which has about a .135
inch kerf +-.

An end view of the regular 10 inch blade with the stacked dado blades.
The 10 inch blade cuts the over hang from the base. Wood blank is
oversized intentionally for this to happen. The eight (8) inch
diameter dado blade set works great with my box call design
measurements.

A zoom out view of the side taper jig and blade set-up. I push the
jig into the saw/dado blades with my right hand holding the body of the
DeStaCo toggle clamp. This operation is dangerous, therefore extra
caution and safety is required. You could make some type of safety
enclosure referencing off the left miter gauge slot shielding most
of the exposed blade.
CUT END TAPER AND LENGTH ON BOX CALL BODY
I took sequence pixs of the six black walnut call bodies, however I
deleted them from the camera and having to take a few pixs
now.............grin if you must!

I like to keep the miter saw set at 90 degrees and make a jig to cut
angles when I have more than a few to complete. Even with stops on
the miter saw, it is sometimes trouble some to get them re-set back to
90 degrees as perfect as possible.

The laser produced line is a tremendous aid for positioning your cut.

A simple pencil line mark used as a length stop gauge. Nothing
high tech there...........grin if you must! I could make a fixed
length stop gauge, but it would have to be located outside the path of
the end of call since there could not be a stop in the path of the call
because I first cut one end of the box taper.
NOTE: The last call bodies I made, I cut one end to length
on the entire lot and then set a stop block for the length so each call
body will have the same length needed to reference in the vertical
radius router jig concave route at each end of the call body.
ROUTING PROFILE FOR THE SOUND BOARDS

I use a 1/2 inch diameter two fluted carbide tipped router bit which has
a cutting length of two (2) inches. The bit has a flush cut
bearing at the base that rides against the pattern profile to cut.
If you cut against the grain on the thin sound boards, you will rupture
and/or tear out the sound boards and also chip wood from the end of the
box call. I flip the box call over and
complete the cut, continuing to route with the grain. With the
router table, you move your work into the router bit, right to left.

Pix of the profile jig for the sound boards taper. There is less
than 1/8 inch of wood to remove at the center of the sound boards and
much more toward the end of the call. The profile jig rides
against the ball bearing at the base of the flush cut router bit.

Pix looking at the bottom of the jig and you can see the over hang that
the router bit will remove.

The profile jig determines the amount of wood removed from the box call
body. The jig has stops to the rear to position the call and to
the left. There is a tapered wedge of wood underneath the call
which keeps the call sound boards vertically orientated. The large
DeStaCo clamps with rubber pressure pads keeps the call securely
attached to the jig.

Another view of the jig with the box call ready to be profile routed.
The Porter-Cable 3 1/2 HP router doesn't even strain with no more
material removed in this case.

A close up pix of the box call sound boards profiled to the shape of the
jig.
There are three (3) more router table jig set ups to complete the call body
and one of them has been shown already being routing the slot for the
wood purfling aka wood marquetry.
I think I will call it a day, of which this has been a productive day.
TOTALED A 35MM 18-55MM CANON ZOOM LENS
While taking pixs of the above routing operation, the camera strap got
caught on the table saw fence guide as I was moving, pulling the camera from my hands, of
which the camera landed on the concrete floor and plastic pieces from
the front of the lens
went flying. The glass lens didn't break, but the camera lens barrel
was badly warped rendering the lens unusable. Luckily, I had an
identical lens on an earlier model Canon 20D that our Son, Bill Jr. gave
me, of which the camera electronics gave out, but the lens was still
good!

I have used a 35MM film camera Nikon F2AS since 1975 and with the
digital age, donated it to
an Antique Store, This is the first major camera accident I have
experienced.
You might be thinking, why not repair! The lens is not too
expensive, but a repair of said lens would be major bucks.
Web page updated by Bill aka Mickey Porter on 06-18-2022.
ROUTE VERTICAL RADIUS TO THE END OF BOX CALL
Each end of the box call has about a 2 1/4 inch concave radius routed to match
the lid convex radius. I use a profile jig I made in conjunction with a 1
inch diameter x 1 inch length two fluted carbide tipped router bit that has
a flush bearing with the outside diameter of the router bit.

The length of end of the box call is a little longer than my original
ones, therefore the flush cut router bit didn't have enough length for a
smooth blending of the two areas...........my bad. I had to use a
drum sanding disk on the drill press and later used a Dremel tool and
3/4 inch diameter sanding drum, of which the Dremel worked better, more
control. I believe I used a 2 inch length flush cut router
bit instead of the 1 inch diameter x 1 inch cutting length router bit on
my earlier batch of call bodies...my bad for sure!

The bearing rides against the profile jig and the router bit removed the
over hang.
ROUTING BASE OF CALL
I use a 3/8 inch "bull nose"
and/or a 1/2 inch bull nose
aka half round
radius router bit to form the radius on the lip of the box call base
mounted in the router table. Router table fence (auxiliary
curtain) is adjusted for the
width and depth of route controlled by the router crank lift mechanism.
My router table has both in feed and out feed fences and I have trouble
from time to time getting snipe at the end of the router because the out
feed fence is not adjusted properly. I have shimmed the fence and
placed masking tape on the fence to built it up several thousands of an
inch which works for a while. The more
"fail safe" method is to use a drop down curtain
attached to your router fence and have a cut out for the router bit if
needed.
With the side of the box call riding against the auxiliary curtain
fence, snipe is eliminated. I need to cut a piece of 12MM
Plexiglas, add vertical slots for adjustment and affix it to the miter
slots in the router fence with appropriate bolts/knobs.
FINISHED THE FIGURED BLACK WALNUT BOX CALLS
Today is 06-21-2022 and finishing up the six (6) figured black walnut
box calls. I am reserving one of them for myself and using an
inlaid mother of pearl lid I did a few years back and finally got around
to using it. The other five (5) calls will be given to our
Grandsons this coming Christmas 2022, our Lord willing of course.


The figured black walnut was hard as a rock and surprised it didn't
splinter out during the manufacturing process! I have another coat
of lacquer to apply to the call bodies and lids and maybe
"kick back" a
little, but when I get antsy, I have to be doing something.
These six figured walnut box calls will be SN 191 thru SN 196.
My earlier calls did not have serial numbers on them; e.g., Custom made
by Bill Porter, Wadesboro, NC, Date, Wood species and where obtained.
The figured walnut calls have no inscription on the base of the call.
I didn't want to take away from the beauty of the figured wood.
The calls have printed Bill Porter and the date made on the inside of
the torpedo nose taper sound boards.
BILL PORTER'S SHOW CASE CALL
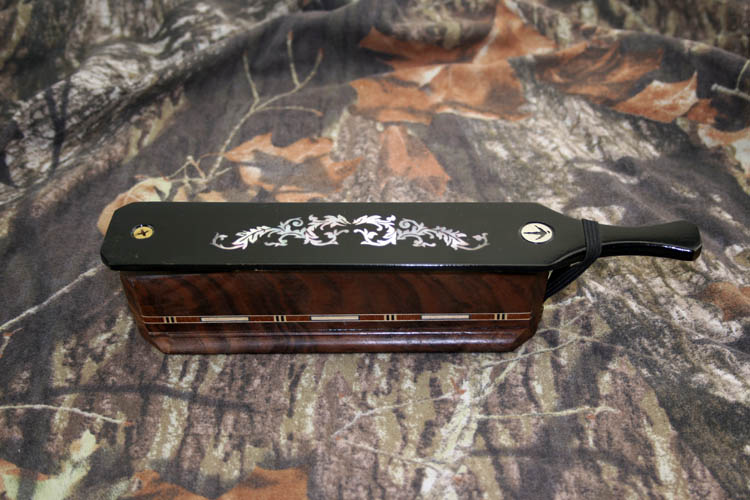
I inlaid the above lid a long time ago and finally got around to putting
it on a call base worthy of the lid. This call will be for my
display case, however I might call an ole long beard in just for fun and
not fire a shot!
The above show case call gifted to our son back in July, 2023 as a
birthday present!
END OF BOX CALL CONSTRUCTION TUTORIAL
This concludes the pictorial tutorial with comments how I make my turkey
box calls.
I will finish the figured black walnut calls and as stated earlier, five will be reserved
for our five (5) Grandsons. I will probably keep one of the six
calls for myself for display.
Hope this tutorial helps someone and the routing techniques and jig
designs I use will
work for other woodworking projects as well.
God bless each and every one of you, and I give God our creator, the
Praise, Honor and Glory through Jesus Christ our Lord and Savior in all
things.
Web page updated by Bill aka Mickey Porter 06-21-2022.
SET UP GENERAL PURPOSE MORTISE JIG FOR BOX CALLS
I already stored away my dedicated mortise jig for the turkey box
calls and decided to set-up my general purpose mortise jig for the box
calls.
The reason being, I inventoried my call wood blanks and have a good
number that was purchased and already trued up being about 2 inches
square and 8 to 25 inches in length. I have a dozen or more of walnut blanks that have some
warp and twist in them, of which will need to be straightened out before
doing the torpedo nose taper. On second thoughts, I doubt I will
process those warped and twisted blanks.
While doing the set-up, I placed a new tapered router bit in the router
collet and made a few test routes setting the depth stop and width.
The DeWalt 3 HP plunger router base casting had red round knobs that lock the east
to west movement of the router onto the 3/8 inch diameter router base
stainless steel rods and was not tight enough allowing the router to slide slightly east
to west making a non-perfect torpedo nose taper in the call body blank,
which might be salvaged. I replaced the red knob brass screws with
regular slotted flat head screws and was able to put plenty of torque
with the flathead screw driver. l will not know for sure until I
cut the sound board taper using the table saw and taper jig.

I prefer the end stop blocks orientated in the north to south
direction versus the east to west orientation as I have on my dedicated
mortise jig for turkey box calls. The black knobs will keep the
stops in place, but like a little more assurance with the clamps,
however one clamp is in the way slightly. I will see if there is enough
reach with the clamp to place in on the left side of the jig.
Since this is my general purpose mortise jig, I will not make permanent
set stops as per my box call dedicated mortise jig.
I will unbox stored turkey box call body blanks and try and get them
machined for later finishing. At the moment, I have a little less
than three dozen box call lids with the basic machining completed on
them and do not plan to set
up the radius cutters for the lid. I have a quantity of machines
lids that have the grain running in the wrong direction and will not use
them. The vertical grain orientation works the best on the box
call lids in my humble opinion.
The black walnut blanks had some warp and twist to them and jointed the
bottom of the call and the side that will rest against the longitudinal
fixed fence and used 12 inch bar clamps instead of the DeStaCo aka
generic clamps which indexes off the bottom of the wood blank. The
Sassafras blanks were 8 inches in length and both DeStaCo toggle clamps
were originally set up for 12 inch length wood blanks.
CALL BODY BLANKS BEING MORTISED

I set the above mortise jig up on 06-25-2022 after spraying lacquer on
five (5) sassafras calls with cedar lids.
Above pix of the torpedo nose taper mortise cut into black walnut, osage
orange, butternut and sassafras completed on 06-27-2022. It
took only forty-five seconds
to complete the mortise in a black walnut blank, whereas it took 2
minutes to complete the torpedo nose taper mortise in sassafras wood
with an old apparently "dull"
router bit. Sharp cutting tools make a difference and are much
safer to use.
Web page updated by Bill aka Mickey Porter on 06-26-2022 and 06-27-2022.
FINISHED THE SOUND BOARD TAPER ON THE BOX CALLS
I installed the 10 inch diameter crosscut saw blade and the dado blades
with a chipper blade and a small spacer to give the proper cut in the
call body blank.
With the new tapered router bit, it was several thousands in diameter
smaller than my original tapered router bit and the torpedo nose taper
mortise would not fit onto the locator on the sound board taper jig and
had to sand the locator down until it fit properly. The sound
board thickness was a little thinner and before sawing the entire lot of
box call blanks, I routed the sound board taper, vertical taper on end
of call body, cut the angle on each end of the call body blank. I
drilled the pilot hole for the lid screw and installed a lid from
another finished call to see how the call sounded and it sounded great.
I believe the wood was butternut.
I then routed the sound board taper on all the call body blanks that I had
routed the torpedo nose taper mortise.

The osage orange blanks were hard as a rock. Two of the six call
bodies "blew out" aka
ruptured from the routing operation; e.g., shaping sound boards and
routing vertical radius on end of box call. I will sand the
vertical radius on the end of the box calls versus trying to route the
radius.

I finished all the machining on the above call bodies on 06-29-2022 sans
the 45 degree end taper which is normally done after the wood marquetry
aka wood purfling is installed.
I don't think I will post any additional pixs on this page, but will
complete half a dozen calls at a time until all are finished. I
had enough wood marquetry aka wood purfling style
#
4 for about three (3) dozen additional
calls.
Web page published by Bill aka Mickey Porter on 06-01-2022 and updated
on 06-28-2022.
NOTE: I recently inventoried and found additional call wood
blanks and thinking about finishing them up. I have a good
amount of black white "stitch" wood purfling that was used on pre-war
Gibson Granada banjos and will use it, since I only have three pieces
left of the style # 4 wood purfling aka wood marquetry strips.
I prefer the style # 4 wood purfling, but it is now too expensive to
purchase from retailers here in the USA.
Web page updated by Bill aka Mickey Porter on 07-15-2022.
INVENTORIED MORE CALL BLANKS AND LID MATERIALS
As stated much earlier, I inventoried the cedar wood boards I had on
hand and selected the ones with as much vertical aka quarter sawn grain
as possible and added the process under the lid construction.
I still had a good amount of call blank wood in sassafras, black walnut,
butternut and poplar and decided to process a good portion of the woods
except the black walnut which is twisted and warped, even though there
were some blanks that had good figured grain. My duck call maker
friend might be able to use the black walnut blanks.
Below is a pix of the call body blanks with the torpedo nose taper
completed and cut to approximate length.

There are several operations to complete including cutting to final
tapered length,
routing the sound board taper and routing each end of the call for a
2.25 inch radius that matches the radius on the lid and cut the end
taper .
I will route the groove for the wood marquetry aka wood purfling on the
call body as needed since I only have a quantity of the black/white
stitch wood purfling as depicted earlier and drill the tapered hole for
the lid brass wood screw and spring. I normally test the call and
lid out for sound before adding the wood marquetry aka wood purfling for
obvious reasons.
NOTE: The above call bodies have all the basic machining
completed except routing for the wood purfling and stored in a plastic
tote, if an when I decide to finish them, but at the moment I don't plan
to do so.
Web page updated by Bill aka Mickey Porter on 07-23-2022.
PORTER CUSTOM CALLS GOING SILENT
When my current inventory of turkey box calls are sold, I do
not plan to manufacture any additional calls.
Web page updated by Bill aka
Mickey Porter on 07-23-2022.
I no longer donate calls to NWTF chapters or support the organization
due to alcoholic bars set up with free drinks as a means to
inebriate potential high dollar spenders and bidders at their banquets.
This is a disgusting and immoral way to conduct business to raise money in my
humble opinion! Also, the usage of
"bar maids" (literally and figuratively) to serve the drinks and assist in the auction is
low class. When you are
of the world, this is a normal protocol.
LEAVING ON A
SPIRITUAL NOTE
If you do not know Jesus Christ as your Lord and Savior, please take
this moment to accept him by Faith into your Life, whereby Salvation
will be attained.
Ephesians 2:8 - 2:9 8 For by grace are ye saved through
faith; and that not of yourselves: [it is] the gift of God: 9 Not of
works, lest any man should boast.
Hebrews 11:1 “Now faith is the substance of things hoped for,
the evidence of things not seen.”
Romans 10:17 “So then faith cometh by hearing, and hearing by
the word of God.”
Open this
link about faith in the King James
Bible.
Romans 10:9 “That if thou shalt confess with thy mouth the
Lord Jesus, and shalt believe in thine heart that God hath raised him
from the dead, thou shalt be saved.”
Open this
link of Bible Verses About Salvation,
King James Version Bible (KJV).
Hebrews 4:12 “For the word of God is quick, and powerful, and
sharper than any two edged sword, piercing even to the dividing asunder
of soul and spirit, and of the joints and marrow, and is a discerner of
the thoughts and intents of the heart.”
Romans 6:23 “For the wages of sin is death; but the gift of
God is eternal life through Jesus Christ our Lord.”
Romans 3:23 “For all have sinned, and come short of the glory
of God;”
Micah 6:8 “He hath shewed thee, O man, what is good; and what
doth the LORD require of thee, but to do justly, and to love mercy, and
to walk humbly with thy God?”
Philippians 4:13 "I can do all things through Christ which
strengtheneth me."


