"Flying Eagle"
"Hearts & Flowers"
"Style 6"
"Florentine Special"


"Bella
Voce"
"Wreath"
Hearts & Flowers


 Scan of actual peghead H&F inlays under glass. The fingerboard
pattern inlays down the neck (width wise) are not spaced like the original
Gibson fingerboard inlays; they are much farther apart. The width
spacing of the Hearts & Flowers was like the Style 6 inlays which had
room for celluloid binding (gold sparkle or black white) on the top of the
fingerboard, which matched the headstock, neck, wood rim and resonator
celluloid.
Scan of actual peghead H&F inlays under glass. The fingerboard
pattern inlays down the neck (width wise) are not spaced like the original
Gibson fingerboard inlays; they are much farther apart. The width
spacing of the Hearts & Flowers was like the Style 6 inlays which had
room for celluloid binding (gold sparkle or black white) on the top of the
fingerboard, which matched the headstock, neck, wood rim and resonator
celluloid.
I do not supply copies of the
above inlay patterns, but you are welcome to reproduce them. However,
the pixel size and quality are reduced for web viewing.
NOTE: Gibson USA takes a firm
and aggressive stance against all makers of counterfeit instruments and
their distribution channels, therefore I would caution anyone against making
a complete Mastertone aka Masterclone of their instrument using the Gibson
logo on the headstock although the early inlay patterns sans the Gibson logo
are subject to public domain.
Click on the above thumbnails for a larger view. For a full scale
printing, you might need to "tweak" the image size. The above patterns
were used for inlaying and cutting mother of pearl and were true to
scale when cut and printed. Xerox copy machines were about the best we had in the 1970's
long before the personal computer. The older machines did not
reproduce at a one to one ratio but were actually reproduced 2 percent
increase due to their design. I remember Frank Neat
supplying me with an excellent Xerox copy of a Florentine Special
fingerboard and peghead of
which I cut a master pattern from. Above patterns were offset printed
and far better than most of the inlay patterns used by individuals cutting
and selling mother of pearl reproduction inlays back in the late 1960's and
1970's. I hauled off reams of the above printed patterns to the
landfill about 20 years ago needing the extra room and do not have printed
patterns to mail out; please do not ask. My original patterns that are mounted under glass are a
minute smaller in size than the above printed patterns due to the difficulty
of getting them scanned and offset printed with the ever present glare off
the scans. Not bad for older technology. I personally cut each
inlay above except for the small dots, slotted squares and shield inlays on
the Bella Voce pattern of which I cut the shield shapes on a pantograph type
machine for a master pattern only.
When reproducing the "Hearts and Flowers" inlay pattern, a
saw cut back into the heart near the shoulder is required, whereas on the
style 6 inlay pattern there is not a cut back into the inlay piece and it
looks like the traditional spade. There is a big difference between
the heart and the spade and many cut the hearts and they look like a spade
instead. They are two distinct pieces although Gibson at times have
switched the patterns and some of the pre-war pearl cutters omitted the saw
cut back into the heart because you have to cut into the heart a small
amount and then backed out and go back into the cut you just made with the
back of the jewelers saw blade bottoming out in the cut you just made and
then come out to finish cutting the design. My tracing of the inlay
pieces does not reveal the true cut back or back cutting detail but I knew
to make the cut back into the material. I used a single spade aka
heart cut piece of mother of pearl to trace the pattern from and used the
same spade aka heart to layout the pattern with also. As I have
mentioned elsewhere, I would have plenty of cut patterns on hand and able to
fit a piece into the hole cut out into the fingerboard and peghead with a
high degree of precision and not able to do so with a single pattern cut due
to the natural variations of the cutting. Pix of some style 6 inlays
that I cut and Jim Yarboro of Gun Barrel City, Texas inlaid back in the
late 1970s or early 1980s:


Jim hand made all the checkerboard binding for the style 6 neck above. Photos by Chris Cioffi.
Also, a large #6 jewelers saw blade was used on most of the Gibson pre-war
inlays although a #4 blade was used many times on the script Gibson logo.
The size #6 blade left a very visible and distinct blade width on the inlays
that required the saw blade cut back into the design. Post -war pearl
cutters used blades too small in width which allowed them to simply make a
turn in and out of the design without "back cutting" which is necessary to
capture the true detail and spirit of the design. Jewelers saw blades
today are not tempered as good as they were in the 1960s and 1970s and I
have cut as many as eleven (11) script Gibson names with a single Vigor
brand #4 blade, however that was the exception to the rule.
Anywhere between two to five script Gibson names could be cut with one
single blade which was about normal. I viewed some old time study
cards and my average cutting time for a script Gibson was five (5) minutes.
I doubt one script name would be possible with a single blade manufactured
today running at a high rate of speed!
Gibson contracted out most of their pre-war inlay work, however they did do
some in house inlay work according to verbal information from George E.
Hall, prewar Gibson employee from 1927 through 1933. I mention George
E. Hall in my biography
page. Pre-war Gibson pearl contractors did
not stack mother of pearl inlays because they used a wood
backing such as poplar to support the random size mother of pearl pieces
when cutting the mother of pearl with a jewelers saw blade. It would be
a nightmare to try and align random size blanks of mother of pearl glued to
the substrate material and then stack such. Those
contractors removed the wood backing from the headstock inlays since the
headstock veneer was about the same thickness as the mother of pearl being
used being around .027 to .040 inches in thickness of which was sanded down
flush with the headstock veneer. I got this information first hand
from George E. Hall and cutting inlays for many, many years, stacking multiple
inlays which requires the backing material, just doesn't work....end of
story! No disrespect to those that publish second and third hand information,
but second and third hand information is not always reliable, even though
with good intentions. My
banjo construction pages, details fairly
accurately the way pre-war Gibson and/or their contractors did cut and inlay
mother of pearl.
It should be noted that Gibson is a registered trademark and would
highly recommend using your own name on your instrument unless it is a
reproduction neck for an original Gibson instrument although the above inlay
patterns sans the Gibson name are now subject to public domain!
My original mother of pearl inlay pattern for the Style 3 "Leaves and
Bows" is mounted under glass and had very few calls for the style 3
back in the 1970s and did not print any master patterns for the style 3, but used
photocopies (Xerox) instead. The Hearts and Flowers and the Flying
Eagle or Reno pattern as some call it were the main patterns most were
building reproduction and/or 5 string necks for when I had my mail order
business. The early style 3 "Diamonds and Squares" were
hardly ever reproduced. Of course there many Wreath, Bella Voce and
Florentine Special patterns completed also with the BV and FS the lesser.
As I stated earlier in the Biography page, the new CNC machine cut inlays
emulating the pre-war Gibson patterns as far as the design itself is very
cheesy and imitation looking to me without the square saw blade cut backs into the
design. On a positive note, the CNC inlays are inlaid and cut with great
precision and that is how I feel and not alone by no means either! I
have noticed much improvement in the designs of late due to smaller and more
durable solid carbide router bits for CNC machines.
I will be adding additional scans to this page as I have the time and
uncover misplaced documents/drawings, etc.
Bill aka Mickey Porter 09-26-09.
INSTRUMENT MAKERS PATTERNS

Above are some patterns for early Stiver, Monteleone and Chestnut custom
mandolins from the early to mid 1970s.
WILBURN O'NEIL HASTY PEGHEAD READY FOR INLAYS
While cleaning out my archery corner, I found an ebony peghead overlay
(Gibson F-5 style) that had cut outs for the inlays. Wilburn had me to
cut a set of Gibson fern inlays with a much shorter stem inlay near the
mandolin nut. I stacked several ebony peghead overlay materials and
glued the corners and placed the inlay pattern on the ebony peghead overlay
blanks using double stick tape.

Wilburn was one of my early customers back in the 1970's, whereas he made
several F-5 Gibson style mandolins using my inlays and inlaid pegheads.
Wilburn Hasty lived in Indian Trail, NC and died in March 2008. His
brother Brons P. Hasty built a Martin Dreadnought style guitar using
Brazilian Rosewood that I believe he purchased from me. Brons died in
2003.
Web page updated by Bill aka Mickey Porter on 05-12-2023.
GIBSON PRE-WAR WOOD RIM BENDING MACHINE
The following are scans of a letter I received from George Hall on
05-11-76 who worked at the Gibson factory from 1927 through 1933 detailing
information concerning the method Gibson used for bending banjo 3-ply wood
rims. George didn't go into detail in this letter as to the exact
protocol or a step by step play of the process and the information about
cutting the wood pieces and the steaming prior to placing the
individual pieces on the bending wheels was verbally discussed only.
The wood pieces were soaked several hours in a vat of water prior to being
placed into a very large pressurized steam chamber and had to be quickly bent around the
forming wheel. I did have a copy of the factory cuts including the lap aka "scarf" taper for the one
piece flange three ply wood rim from Gibson but did not obtain the info direct from Gibson
and/or George Hall for the outer mortise and tongue for the two piece flange
wood rim which required the additional material for the radius portion of
the tube. Gibson cut the mortise groove into the three ply outer
lamination on a lathe. Having personally steam bent wood, one has to
work extremely fast before the wood cools down. Steamed wood in
combination with heated forming wheels/mold works much better. Their system was crude by today's technology, but it was very effective when
properly executed, whereas the main problem was controlling the ply thickness
and cutting the correct length and taper because if one is out of tolerance,
the rest get further out in the sequence as evidenced by many of their wood
rims . Also, you will notice that
George didn't sign the letter and he actually photocopied the letter that he
sent to me. George was very secretive for whatever reason or just
being somewhat loyal to Gibson, I can't recall. Click on the thumbnails pixs
for a larger screen view:

 George has a very cool personal logo or trademark !
 You need a large quantity of different size bending wheels to effect high
yield production.
You need a large quantity of different size bending wheels to effect high
yield production.

Below is another letter I received from George Hall dated June 4, 1973 which
I already have linked in the
About Us page under
George Hall which gives some additional information on their form for
bending the wood rim components:
.
George knew the short comings of the 3-ply wood rim method of construction
since he was there and the
main reason for his jellyroll wood rim concept even though he did not
actually ever bend a jellyroll wood rim to my understanding and whether or not
he conceived the idea before meeting Dave Kennedy, I do not know! To
my knowledge, Davis aka Dave Kennedy was the first person to manufacture the jellyroll
wood rim and supplied Gibson with 60 of his jellyroll wood rims in the early
to mid 1970s.
Bill aka Mickey Porter 09-27-09.
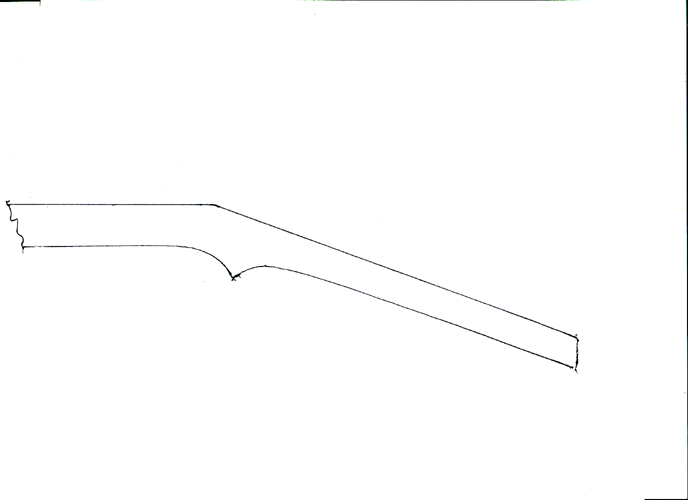
NECK RADIUS GAUGE

Above is a Neck Radius Gauge that was taken from a Gibson pre-war 5-string
neck that felt and played good and is typical of the Gibson pre-war shape.
The neck radius from the nut to the 5th fret has more of a D shape than from
the 6th to the 12th fret radius gauge which is more of a half round as
produced by a cutter. Many including myself like this type of
shape which can be modified to more of an egg, V or elliptical shape
to suit the individual preference which cannot normally be obtained on a
production banjo.
The original pattern for the above pattern was produced by bending a piece
of soft lead flat material around the original Gibson pre-war 5-string neck
and then, individual templates were made for each of the fret areas above.
My good friend,
Harold Chriscoe of Seagrove, NC made the original
individual neck profile templates,
way back when.
 The Pre-War Gibson neck shape from the volute to the 5th fret looks similar
to this ellipse shape for sure.
The Pre-War Gibson neck shape from the volute to the 5th fret looks similar
to this ellipse shape for sure.
NOTE:
All my templates, jigs and fixtures that I had on hand was given to
Gary Pressley
of Indian Trail, NC on July 17, 2018.
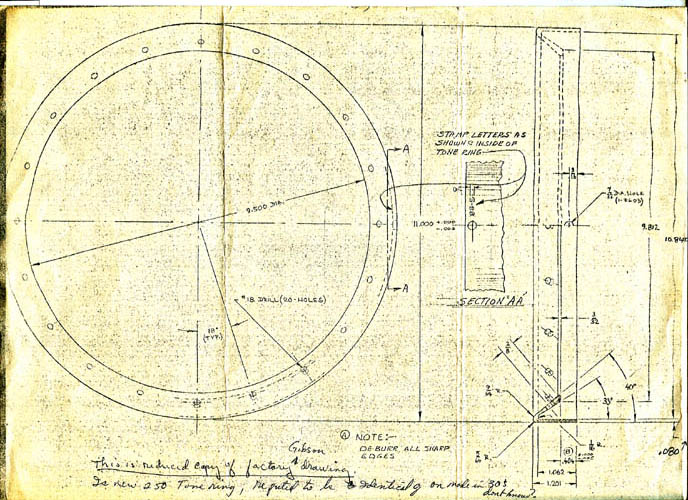
RB18 FON 744-1 Notes taken on 05-07-76 of the tone ring and
neck/fingerboard measurements:

The tone ring was out of round and there was at least .005 thousands
difference in the tone ring skirt also. This tone ring did not have
the prominent "bull nose" type radius cut on the inside as did some of the
RB75s. I believe that radius cut on this tone ring accounts for the
extra two (2) ounces of weight. This 50 oz. tone ring sounds good on
this banjo. The degree angles listed for the slope seems a bit
confusing and I guess depends on where the reference point was taken at the
time.

The letter M in the above notes references the middle of the neck thickness
between that fret and the next one going up the scale; e.g., the M
12th measurement represents the middle between the 12th and the 13th fret if
memory is correct. This neck seems a little thin in thickness for a
curly maple neck and according to the owner does move around a little
depending on the humidity and is an excellent sounding pre-war instrument!
You might need a major in Egyptian Hieroglyphics to decode all
the scribbling I call notes.
Grin if you must!
Web posted on 11-21-11 by
Bill aka Mickey Porter.
UPDATE
I talked with Glenn
Chriscoe, one of Harold Chriscoe's sons today, (09-14-2022) and Glenn gave
me permission to place on this website that Harold owned Gibson pre-war
RB18 banjo FON 744-1, of which was later sold upon the death of
his Dad along with other valuable pre-war instruments.
I thoroughly enjoyed talking with Glenn Chriscoe and we
both reminisced about his dad Harold and it seems like only yesterday, I
posted the pictures taken of Harold on 07-31-10 added to my
biography page.
Time definitely waits for no one.
Web page updated by Bill aka Mickey Porter on 09-14-2022.
TB7 TONE RING MEASUREMENTS
Below scan of measurements taken from a "dental type" casting done by John
Monteleone on 03-19-76 of a TB7 tone ring that we horse traded some inlays
for his time. I don't have the serial number on file of that banjo but
the alloy composition was nearly 100 percent copper per an analysis done
which should be referenced in the About Us page under tone rings.

I kept the casting for years in my Kennedy machinists tool box but finally
threw it out with other "junk" that I didn't have a need for.
Grin if you must!
PRE-WAR COORDINATOR RODS

Above informal drawing of pre-war coordinator rods that I made. I had
very few calls for this type rods and mostly sold the later type that fit
the 10-32 tpi neck lag bolts without the long hex nut.
9550-38 NOTES TAKEN ON 09-14-73
Below scan of notes taken from banjo FON 9550-38 on 09-13-74 and the
instrument was purchased on May 1, 1930 at Salter Music Store in Wilmington,
Delaware....penciled inside of resonator. Don't remember what happened
to this instrument.

8836-50 NOTES TAKEN ON 01-06-73

9220-2 NOTES TAKEN

ONE PIECE FLANGE HEEL CUTTER DRAWING

Prior to this cutter, I used cutters that ran in a high speed drill press
that were were secured at the base of the cutter into a heavy bronze bushing
and a heavy steel rotating fixture at about 5.5 inch Radius moved the neck
blank into the cutter. Had excellent results with those drill press
cutters but you need a heavy duty drill press and solid fixturing for
safety.
TIME CHART FOR CUTTING SCRIPT GIBSON

The above card shows preparing 100 mother of pearl blanks to cut the script
Gibson. The cutting time for 20 units came out to 5.05 minutes each.
It took a little over 1 minute for each script Gibson to get to the cutting
stage. Not too bad for using a jewelers saw blade in a scroll saw and
back then cutting inlays was like second nature...you didn't think about
what you were doing, it just happened and came out excellent too.
TIME CHART FOR CUTTING VARIOUS PATTERNS; RB4, RB5, RB6, H&F, BELLA
VOCHE AND FLORENTINE SPECIAL


The above cutting time survey was taken over a five day period with 29
inlay patterns cut. Apparently there were others things to do in
between the actual cutting times listed. It doesn't take into account the sorting/grading
of the mother of pearl blanks, gluing them to substrate, cutting out the
paper cutting pattern and laying out the paper pattern onto the mother of
pearl. See this link for details:
Banjo Construction
Web posted on 11-22-11 by Bill aka Mickey Porter.
GIBSON 1970s 5-STRING BANJO NECK DISSECTED TO SHOW THE
LOCATION OF THE TRUSS ROD

Above is pix of a Gibson mahogany 5-string neck that I cut in half to see
the orientation of their truss rod. I "horse traded" for
a quantity of their mahogany neck blanks that were ready for the fingerboard
and peghead overlays. The carving was done on a spindle carver and I
am sure they contracted those necks out...don't know that for sure.
There was a good .125 plus curve in the rod near the center length of the
neck blank with each end positioned higher toward the fingerboard with the
majority of the rod below the centerline mass of the neck. I placed a
neck template on side profile of the neck blank and traced around it since
the neck was oversize for my usage to get a little better perspective of the
truss rod orientation. I never used one of their neck blanks but
traded and/or sold them off to whoever wanted one. There is an
alignment hole drilled in the fingerboard area near the 3rd fret placement
and the 20th fret for securing to their carving machine holding fixture and
could be used to align the fingerboard. Post war Gibson many times
contracted out their fingerboards and they were fretted and bound before
placing onto a neck blank as above. I believe the above neck
blank was for their reintroduced tube and plate flange by the way the neck
heel is "hogged" out.
GIBSON TRUSS ROD PATENT

Notice that the truss rod is basically below the center line of the neck and
the reason it worked at all. If the truss rod was closer to the
fingerboard, it would create a bow for sure.
BELLA VOCE NECK CANNIBALIZED

Above pix of a Bella Voce neck that was cannibalized. I think I
obtained it from Tom Morgan or Paul Tester back in the early 1970s.
Back then and earlier, cannibalization of tenor and plectrum necks were the
"norm" when 5-string replacement necks were needed.
Web posted on 12-04-11 by Bill aka Mickey Porter.
TRUSS ROD ADJUSTMENT

Above banjo adjustment instruction booklet was with a 1936 Gibson RB00
purchased by Len Stolz of Clarksville, TN. I personally do not adjust
the co-ordinator rods to change the action and IMHO doing so
can distort the wood rim which is not a good thing. I prefer to tweak
the banjo heel angle for as perfect a fit as possible with the desired
string action depending on the bridge height.
Web published by Bill aka Mickey Porter 01-01-12 with permission from Len
Stolz, Clarksville, TN.
GIBSON PEGHEAD NECK ANGLE
Gibson peghead angle above about 20.4 degrees. The neck side
profile template I used back in the late 1960s and through out the 70s was
19.5 degrees. 20 degrees is typical of the majority of pre-war
Mastertone banjos!
Web published by Bill aka Mickey Porter 01-14-12.
Holographic Universe Slide Show
.pps format:
Hyperlink to Gibson Pre-War One Piece Flange in .pdf format:
One
Piece Flange
This blueprint was posted on the BHO forum by Frank
Schoepf of Hampstead, Maryland.
GIBSON G-BB FLATHEAD TONE RING - REDUCED FACTORY
DRAWING FROM THE 1970S
This tone ring weighed around 2.4 lbs. and coupled with the 11 ply wood rim
from Jasper Wood Products rendered a horrible sounding banjo. This ring had
an excellent tin bronze alloy composition but did not have enough
mass. I am not sure if Riverside Foundry & Galvanizing Company or
Kulesh manufactured this ring but thinking it was Kulesh.

I believe Frank Schoepf of Hampstead, Maryland emailed me this drawing which
is self-explanatory.
ORIGINAL MUSICAL INSTRUMENTS (DOPYERA BROTHERS)
Below a couple old invoices from the early 1970s back when Rudy and Ed
Dopyera were active making the old style resophonic guitars before
they obtained the trademark (DOBRO) rights back again for their original invention.
Gibson USA ended up with the Dobro Trademark rights later, if my memory is correct.


Check the cost of the plated brass cover plate; 25 bucks.
It didn't look like they were writing a lot of invoices either, since most
companies use consecutive invoice numbers from year to year.
My scanner definitely has some issues, but will milk it as long as I
can......grin if you must!
Web published update by Bill aka Mickey Porter on 04-06-17.
LEAVING ON A SPIRITUAL NOTE
If you do not know Jesus Christ as your Lord and Savior, please take this
moment to accept him by Faith into your Life, whereby Salvation will be
attained.
Ephesians 2:8 - 2:9 8 For by grace are ye saved through faith;
and that not of yourselves: [it is] the gift of God: 9 Not of works, lest
any man should boast.
Hebrews 11:1 “Now faith is the substance of things hoped for, the
evidence of things not seen.”
Romans 10:17 “So then faith cometh by hearing, and hearing by the
word of God.”
Open this
link about faith in the King James Bible.
Romans 10:9 “That if thou shalt confess with thy mouth the Lord
Jesus, and shalt believe in thine heart that God hath raised him from the
dead, thou shalt be saved.”
Open this
link of Bible Verses About Salvation, King
James Version Bible (KJV).
Hebrews 4:12 “For the word of God is quick, and powerful, and
sharper than any two edged sword, piercing even to the dividing asunder of
soul and spirit, and of the joints and marrow, and is a discerner of the
thoughts and intents of the heart.”
Romans 6:23 “For the wages of sin is death; but the gift of God is
eternal life through Jesus Christ our Lord.”
Romans 3:23 “For all have sinned, and come short of the glory of
God;”
Micah 6:8 “He hath shewed thee, O man, what is good; and what doth
the LORD require of thee, but to do justly, and to love mercy, and to walk
humbly with thy God?”
Philippians 4:13 "I can do all things through Christ which
strengtheneth me."


