CUTTING PATTERN TO MOTHER OF PEARL


Now comes the fun part of getting your cutting pattern onto the mother of
pearl blanks. Gibson and/or their vendors in the pre-war days had thin metal zinc plated
scribe inlay templates for each inlay design and placed the template onto the
mother of pearl blank and scribed around the template with a small metal
scribe and later inked the scribed lines in which is a hard way to do it.
I expect if one was use to cutting to the thin scribed line since it would
be much thinner than the actual width of the jewelers saw blade, one could
cut a very accurate pattern. I have seen some pre-war wreath patterns
enlarged four or five times that were still nearly perfect; however
there were many that were cut crude by my own standard! The zinc
pattern method that Gibson used to transfer a pattern to the mother of pearl
blanks was related to me by George Hall in the early 1970s, a Gibson
pre-war employee from 1927 thru 1933 which I mention in the
Biography webpage.
In my case, the Porter method, I have a true to scale
printed pattern of my Flaming Claw design which has both the fingerboard and
peghead inlay patterns and an identical to scale pattern to use when cutting
the peghead and fingerboard material to receive the precut inlays.
The first step is to cut around each printed inlay design with a pair of scissors
leaving enough black background edge to facilitate cutting next to the white
pattern (actual inlay shape). After years of cutting inlays, I
could easily maneuver the material into the saw blade cutting to the edge
of the white pattern without any real conscious effort...it just happened
being second nature so to speak. I will discuss the mechanics of
cutting later on. The above master pattern was cut using this same
technique except I stacked and glued two pieces of mother of pearl material
together to cut a matching right and left pattern and later photographed and
printed the cut inlays for a master pattern to print from. This
technique of stacking multiple inlays does not work for the actual cutting
of the inlay for fingerboards since you need the backing to facilitate
inlaying the fingerboard, unless you route the cavity. I have NEVER
seen a Gibson pre-war banjo fingerboard that was cannibalized that did
not have the exact matching substrate material glued to the inlay pattern
which tells me that they did not stack multiple fingerboard inlay pieces;
however, it would be possible to stack multiple banjo headstock inlays since
Gibson did not use a backing substrate when inlaying the pegheads due to the
veneer thickness being about the same thickness as the inlays, but I do not
believe they cut stacked inlay material from my personal experience of
cutting inlays off an on for over four (4) decades due to the difficulty of
cutting the inlays, the distortion between the top and bottom pieces
in a production environment and you can only stack so much material due to
the stroke or cutting length of the machine that holds the standard jewelers
saw blade.


I have used several methods to apply the cutting pattern to the inlay
material but have found that Scotch brand clear double stick tape worked the
best for me. Many fine Craftsmen use rubber cement but this is the
Porter method. One inch width clear double stick is the best width
to use but the last roll I purchased was only 3/4 inch wide and do not like
it as well because it takes four strips instead of three to cover the inlays
and substrate material. I first apply the double stick tape to the
entire mother of pearl making
sure you do not have any area that is not covered, otherwise your pattern
might come loose in the middle of cutting a critical area and that is bad
news for sure with the high dollar cost of the mother of pearl raw material
today! I use a small utility knife or X-Acto type small blade and try
and fit the larger patterns onto the mother of pearl first. I will "eye"
the piece before actually placing the pattern down onto the double stick tape and when I
am satisfied, I will position the paper cutting pattern onto the mother of
pearl blank. After fitting the larger cutting pattern pieces onto the
mother of pearl, I will then fit the smaller pieces in. Be sure and
leave several saw blade widths between your pattern. It is best not to be
too frugal and give yourself plenty of room between the more delicate
designs. A little trick when getting all the cutting patterns onto the
mother of pearl blanks, use your finger as if you were being finger printed
or in my case finger printing someone;
in other words, roll your finger across the pattern otherwise you will pull
the double stick tape up from the mother of pearl blanks. Do this over the
entire substrate material making sure the double stick tape is adhered to
both the paper pattern and the mother of pearl inlay blank. When
cutting years ago, there was plenty of pearl and regular dust in the shop
and I would sometimes sprinkle some dust over the double stick tape after
applying the paper patterns and this would save some time when pressing down
the pattern and double stick tape since it would not stick to your fingers
and pull up from the balsa wood substrate material.


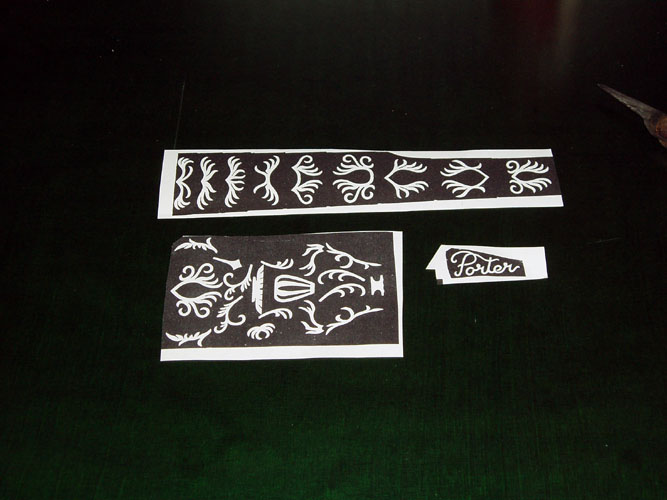
Above first two pixs from left to right of the Flaming Claw inlay pattern
double stick taped to the mother of pearl and balsa wood substrate material
ready for cutting. The next pix shows some scrap balsa wood and inlay
patterns from years back and the pix on the far right is more current inlays
that were cut using the above technique and later removed from the balsa
wood substrate backing from the mother of pearl and abalone inlays by
placing the inlays in boiling water for about 15 to 20 minutes. Since
those inlays will be inlaid using a cavity cut out by a small router instead
of the Gibson method of cutting through the entire fingerboard and peghead
material, the substrate balsa wood backing is not needed.
LEAVING ON A
SPIRITUAL NOTE
If you do not know Jesus Christ as your Lord and Savior, please take this
moment to accept him by Faith into your Life, whereby Salvation will be
attained.
Ephesians 2:8 - 2:9 8 For by grace are ye saved through faith;
and that not of yourselves: [it is] the gift of God: 9 Not of works, lest
any man should boast.
Hebrews 11:1 “Now faith is the substance of things hoped for, the
evidence of things not seen.”
Romans 10:17 “So then faith cometh by hearing, and hearing by the
word of God.”
Open this
link about faith in the King James Bible.
Romans 10:9 “That if thou shalt confess with thy mouth the Lord
Jesus, and shalt believe in thine heart that God hath raised him from the
dead, thou shalt be saved.”
Open this
link of Bible Verses About Salvation, King
James Version Bible (KJV).
Hebrews 4:12 “For the word of God is quick, and powerful, and
sharper than any two edged sword, piercing even to the dividing asunder of
soul and spirit, and of the joints and marrow, and is a discerner of the
thoughts and intents of the heart.”
Romans 6:23 “For the wages of sin is death; but the gift of God is
eternal life through Jesus Christ our Lord.”
Romans 3:23 “For all have sinned, and come short of the glory of
God;”
Micah 6:8 “He hath shewed thee, O man, what is good; and what doth
the LORD require of thee, but to do justly, and to love mercy, and to walk
humbly with thy God?”
Philippians 4:13 "I can do all things through Christ which
strengtheneth me."
PREVIOUS PAGE
NEXT PAGE
BANJO CONSTRUCTION HOME PAGE